
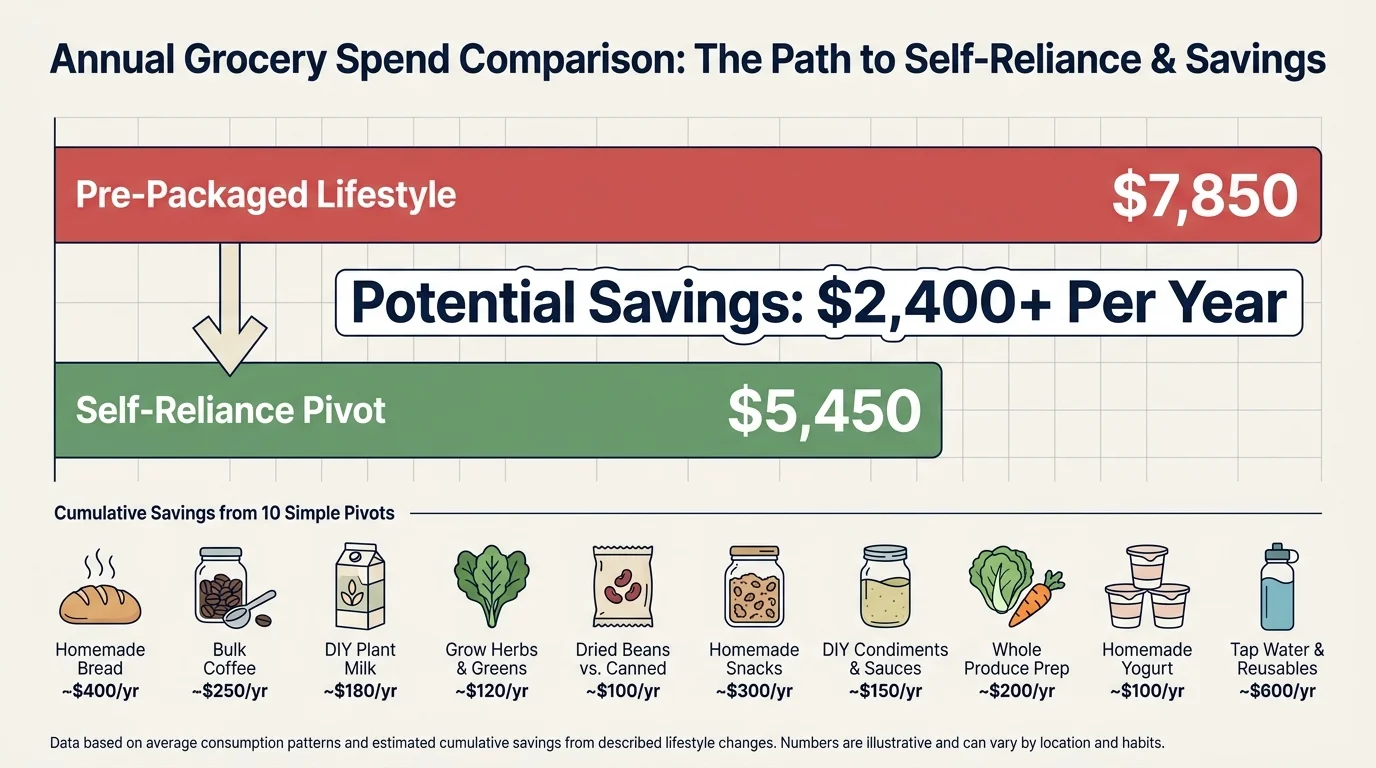
You can slash your monthly grocery bill by hundreds of dollars simply by pivoting away from convenient, pre-packaged supermarket staples. Record-high inflation and shifting food habits have fundamentally changed the way Americans shop, triggering massive new grocery trends focused on self-reliance. Making homemade food from scratch is no longer just a hobby for homesteaders; it is a vital strategy for saving money and taking control of your family budget. Supermarket brands charge outrageous premiums for basic goods composed mostly of water, sugar, or cheap fillers. By reclaiming your kitchen and producing these ten everyday items yourself, you cut out the middleman, dramatically reduce your spending, and enjoy higher quality meals without the hidden preservatives.

Tip #1: Oat Milk
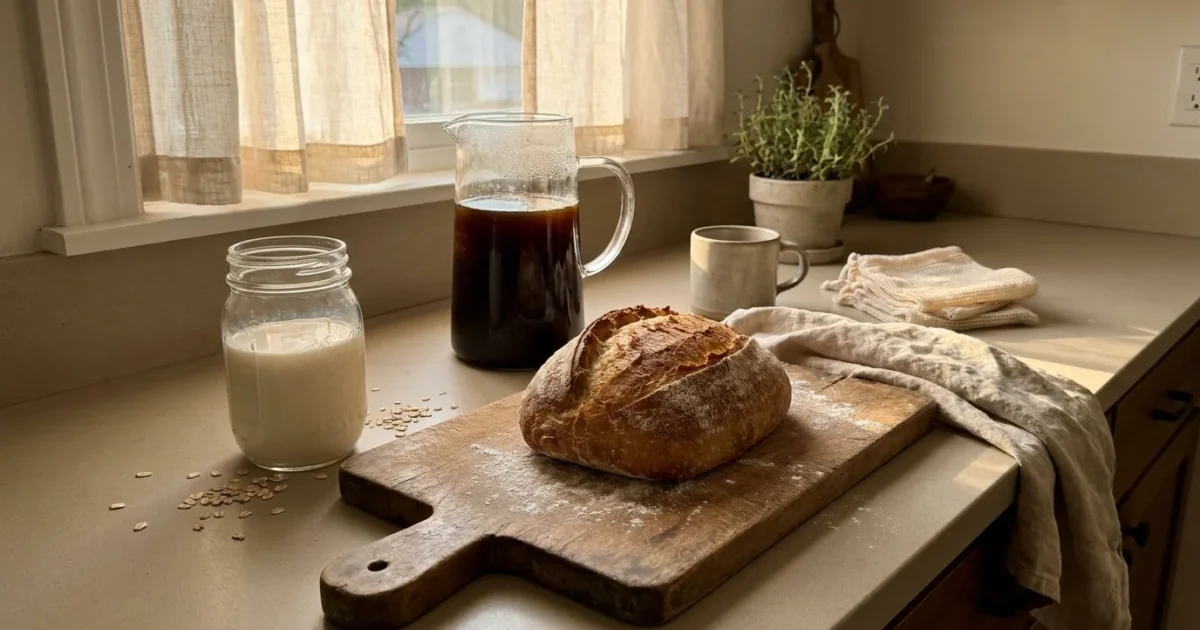
You walk down the dairy aisle and see cartons of premium oat milk priced at six dollars. When you flip that carton around, you realize you are paying a massive markup for filtered water, a handful of oats, and cheap seed oils acting as emulsifiers. You can choose to produce a superior product at home for pennies on the dollar.
Making oat milk requires exactly two base ingredients: rolled oats and cold water. You simply blend one cup of oats with four cups of ice-cold water for thirty seconds, then strain the liquid through a tight-weave towel or a dedicated nut milk bag. The secret to avoiding the dreaded slimy texture involves using ice water and refusing to over-blend the mixture. Heat causes oats to release starch, which creates a gelatinous consistency you want to avoid.
By taking three minutes out of your Sunday evening to batch-prepare this staple, you keep dozens of dollars in your pocket every month. You completely eliminate industrial gums, artificial flavors, and preservatives from your morning coffee routine. A standard container of oats costs around four dollars and yields roughly fifteen batches of milk, driving your cost per carton down to less than thirty cents.
Tip #2: Cold Brew Coffee
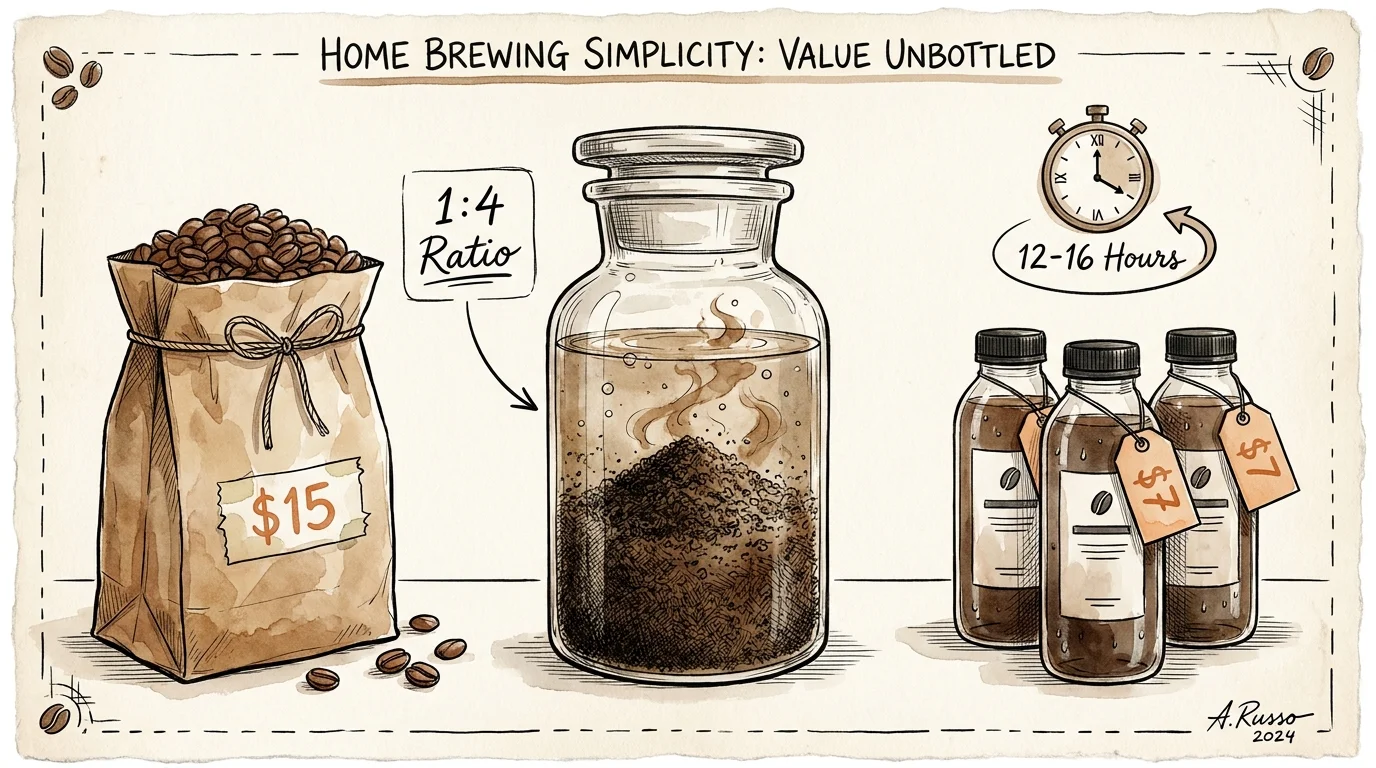
Coffee companies have executed a brilliant marketing coup by convincing consumers that cold brew requires industrial equipment and specialized brewing skills. They bottle the dark liquid, place it in the refrigerated section, and charge six to seven dollars for a few servings. The reality exposes a much simpler truth—cold brew is the easiest beverage you can possibly make in your own kitchen.
You do not need expensive machines or elaborate paper filter systems to create a rich, smooth coffee concentrate. You merely combine coarsely ground coffee beans with room-temperature water in a large glass jar or pitcher. Use a standard ratio of one part coffee to four parts water for a potent concentrate. Give the mixture a gentle stir to ensure all grounds are saturated, leave it on your kitchen counter for twelve to sixteen hours, and strain out the grounds using a standard fine-mesh sieve lined with cheesecloth.
A standard fifteen-dollar bag of whole bean coffee yields enough concentrate to last an entire week, drastically undercutting the cost of commercial alternatives. You dictate the exact strength of your morning beverage, you control the flavor profile by selecting your preferred beans, and you stop funding the astronomical profit margins of national coffee chains.

Tip #3: Salad Dressing
Turn a bottle of store-bought salad dressing around and read the first three ingredients. You will almost certainly find water, soybean oil, and high-fructose corn syrup, followed by a paragraph of unpronounceable chemical stabilizers. Food manufacturers charge four to six dollars for these bottles, selling you cheap filler ingredients under the guise of health food. Making your own vinaigrettes and creamy dressings takes less time than driving to the supermarket.
A classic vinaigrette requires a simple formula: three parts oil to one part acid. You pour three tablespoons of extra virgin olive oil and one tablespoon of apple cider vinegar or lemon juice into a small glass jar. Add a pinch of salt, a crack of black pepper, and a teaspoon of Dijon mustard to act as an emulsifier. Screw the lid onto the jar and shake it vigorously for ten seconds. The mustard binds the oil and vinegar together, creating a perfectly smooth, restaurant-quality dressing.
You can easily expand this master recipe to recreate any dressing you desire. Add minced garlic and Italian herbs for a zesty marinade, or whisk in a spoonful of plain Greek yogurt and fresh dill to mimic a rich ranch dressing. By utilizing pantry staples you already own, you bypass the hidden sugars in commercial brands and trim a consistent, recurring expense from your grocery budget.
Tip #4: Artisan Sandwich Bread
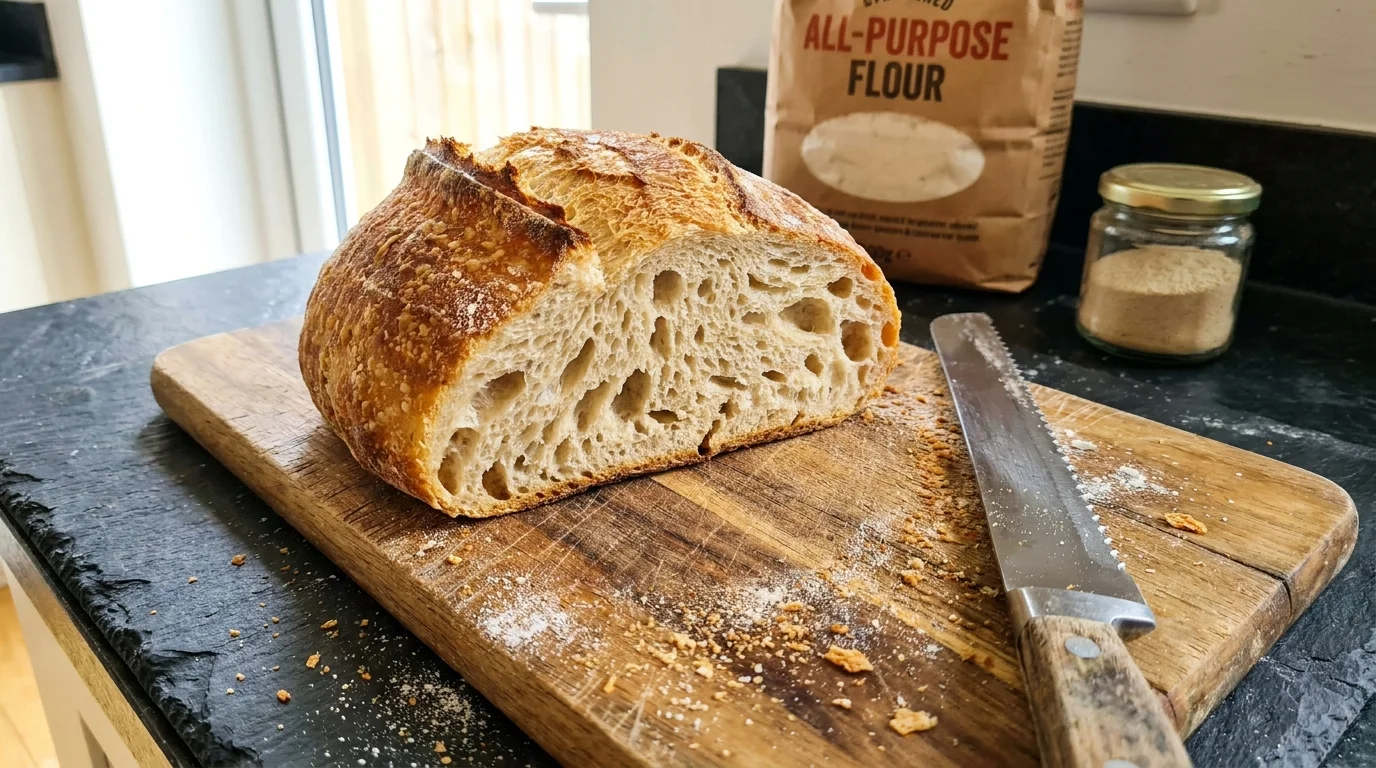
The artisan bakery aesthetic has heavily infiltrated the bread aisle, pushing the price of a standard rustic loaf to seven or eight dollars. Even basic sandwich bread often costs four dollars a bag, despite containing dough conditioners and preservatives designed to keep it soft on a delivery truck for three weeks. As grocery prices squeeze tighter, households are returning to the fundamental art of baking their own daily bread.
You do not need a culinary degree to bake exceptional bread at home. The popular no-knead method requires nothing more than all-purpose flour, water, salt, and standard active dry yeast. You mix these four ingredients in a bowl with a wooden spoon until a shaggy dough forms, cover it, and let it sit on your counter overnight. The next day, you dump the dough into a preheated Dutch oven and bake it. The enclosed pot traps steam, producing a bakery-style crust and a tender, airy interior.
The financial breakdown makes a compelling case for adopting this habit. A five-pound bag of high-quality unbleached flour costs around five dollars and provides enough volume to bake six large loaves. Your cost per loaf plummets to less than one dollar. You gain total control over the ingredients feeding your family, and you fill your home with the unmatched aroma of freshly baked bread.
Tip #5: Hummus and Bean Dips
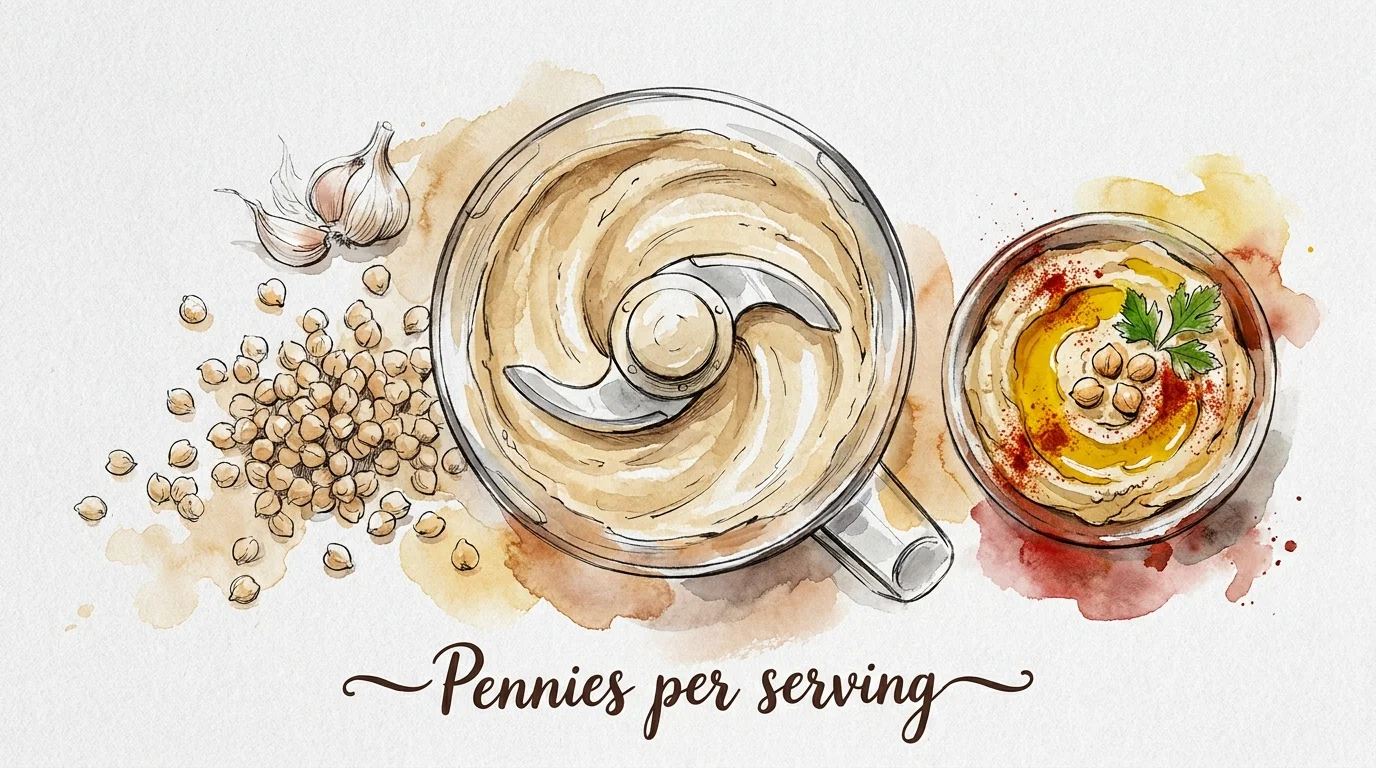
A tiny ten-ounce tub of hummus currently commands five dollars at most major grocery stores. This pricing borders on extortion when you realize the primary ingredient is the humble chickpea, one of the cheapest agricultural products on the planet. Savvy snackers refuse to pay luxury prices for puréed legumes and have completely shifted their hummus consumption to the home kitchen.
You can create a massive batch of rich, velvety hummus using a basic food processor and a few pantry staples. Drain a one-dollar can of chickpeas and toss them into the processor bowl along with tahini, fresh lemon juice, a garlic clove, and a generous pinch of cumin. The secret to achieving that ultra-smooth, commercial texture involves tossing a few ice cubes into the food processor while the blades are spinning. The ice water whips air into the tahini, creating a luxuriously creamy consistency.
For an even more economical approach, you can purchase dried chickpeas in bulk and boil them yourself, bringing the cost of a large batch down to roughly fifty cents. Homemade hummus stays fresh in your refrigerator for up to a week, providing a dense, protein-packed snack for a fraction of the retail cost.
Tip #6: Premium Granola
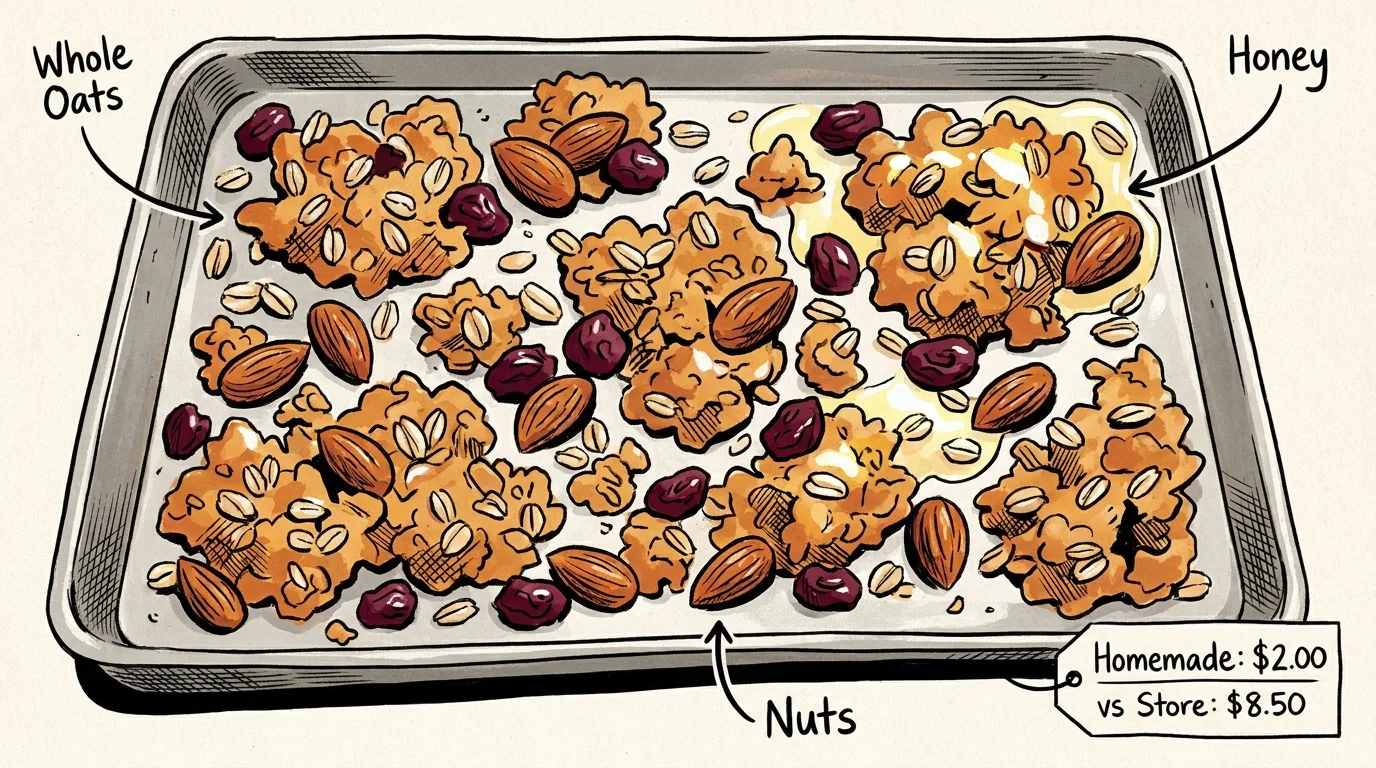
Granola benefits from a powerful health halo that allows food companies to charge astonishing prices for very little product. You routinely see small, twelve-ounce bags of artisanal granola priced at eight dollars or more. When you analyze the contents, you find rolled oats, massive quantities of refined sugar, and cheap vegetable oils baked together. You can replicate and dramatically improve this breakfast staple in your own oven for roughly two dollars a batch.
The process demands almost no active kitchen time. You simply toss three cups of old-fashioned rolled oats with a half-cup of melted coconut oil and a half-cup of real maple syrup or honey. Spread this mixture evenly across a parchment-lined baking sheet and bake it at three hundred degrees for roughly twenty-five minutes. If you want those massive, crunchy clusters everyone loves, press the wet mixture down firmly into the pan before baking, and let it cool completely undisturbed before breaking it apart.
Making granola at home allows you to control the sugar content and customize the flavor profile to your exact preferences. You secure a massive financial victory by turning bulk, inexpensive grains into a premium breakfast cereal without paying the boutique grocery store markup.

Tip #7: Pure Vanilla Extract
Real vanilla extract has experienced dramatic price spikes over the past decade due to weather events in Madagascar and supply chain constraints. In response, supermarkets flooded their shelves with imitation vanilla flavoring derived from wood pulp or synthetic petrochemicals. If you want pure vanilla extract without paying twenty dollars for a tiny two-ounce bottle, you must embrace the incredibly simple process of making it yourself.
Creating homemade vanilla extract requires upfront patience but yields extraordinary long-term financial rewards. You need exactly two ingredients: vanilla beans and an inexpensive, eighty-proof vodka. You purchase Grade B vanilla beans online and split them down the middle with a sharp knife to expose the caviar inside. Submerge five or six beans in an eight-ounce glass bottle of vodka, seal it tightly, and place it in a dark cupboard.
The alcohol slowly extracts the complex flavor compounds from the beans. After six to twelve months, you possess a dark, incredibly fragrant extract that rivals the finest professional baking supplies in the world. As you use the extract, you can continually top off the bottle with more vodka, effectively creating a perpetual supply of pure vanilla that will last for years and save you hundreds of dollars.
Tip #8: Bone Broth and Stocks
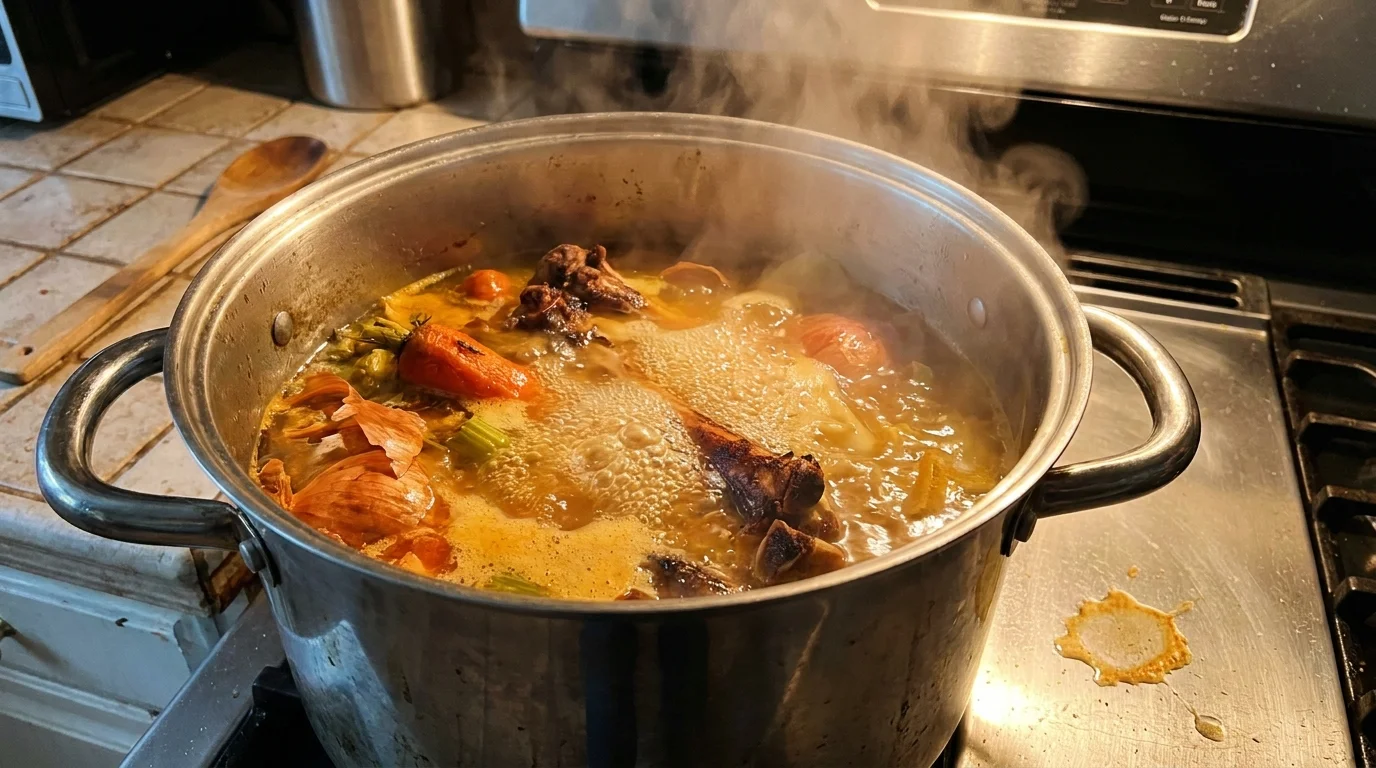
The wellness industry successfully rebranded traditional soup stock as bone broth, aggressively marketing its collagen content and joint-supporting benefits. This brilliant pivot allowed grocery stores to start charging seven dollars for a standard thirty-two-ounce carton. Paying a premium for what is essentially flavored water extracted from discarded animal bones stands as one of the most inefficient uses of your grocery budget.
You can produce gallons of rich, gelatinous bone broth at home for absolutely zero additional cost by adopting a simple zero-waste kitchen habit. Keep a large, resealable bag in your freezer and fill it with everyday kitchen scraps. Toss in leftover chicken carcasses, beef bones, onion skins, carrot peels, and celery ends instead of throwing them in the trash. Once the bag is full, dump the frozen contents into a large slow cooker or stockpot.
Cover the scraps with water, add a splash of apple cider vinegar to help extract the minerals from the bones, and let the mixture simmer on low heat for twelve to twenty-four hours. You strain the liquid into glass jars and end up with a deeply flavorful, nutrient-dense broth. You completely eliminate a costly grocery staple while simultaneously reducing your household food waste.
Tip #9: Specialty Nut Butters
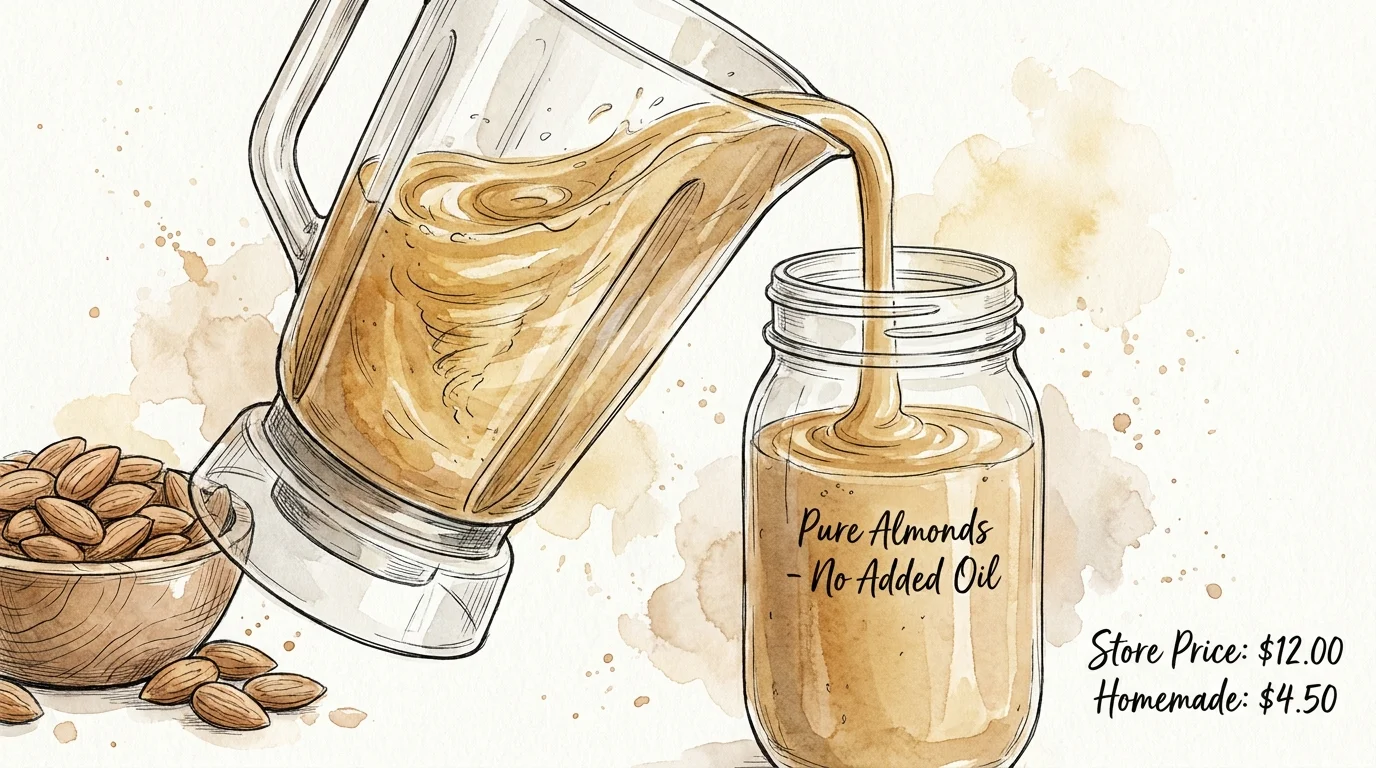
Peanut butter remains relatively affordable, but the moment you step into the territory of specialty nut butters, the prices become punitive. Almond butter, cashew butter, and macadamia nut spreads frequently cost between ten and fifteen dollars for a modest sixteen-ounce jar. Supermarket brands also sneak in palm oil to prevent separation and add unnecessary sugars to mask the flavor of lower-quality nuts.
You can bypass these luxury markups entirely if you own a standard food processor. Buy a bulk bag of raw or dry-roasted almonds, dump them into the food processor bowl, and turn the machine on. The transformation requires patience. The nuts will initially break down into a fine powder, then form a thick paste, and eventually release their natural oils to turn into a silky, drizzly butter.
You do not need to add additional oils to achieve the correct texture; you just need to let the machine run its course for about ten minutes. By purchasing bulk nuts and processing them yourself, you cut your specialty nut butter costs in half while guaranteeing a pure, single-ingredient product for your morning toast or smoothies.
Tip #10: Spice Blends and Rubs
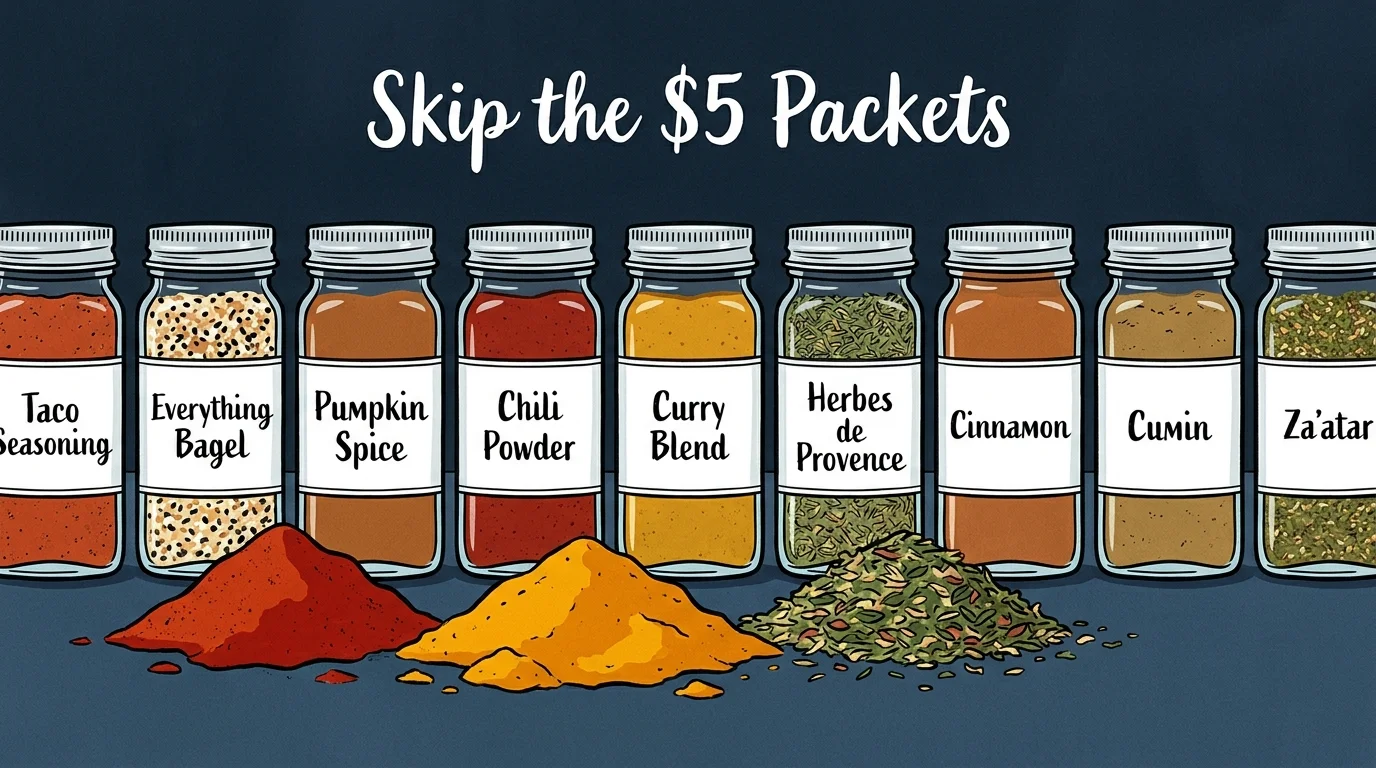
Pre-packaged spice blends represent one of the most deceptive pricing models in the entire supermarket. A standard packet of taco seasoning, poultry rub, or pumpkin pie spice costs roughly two dollars for just over an ounce of product. When you calculate the price per pound, you realize you are paying over thirty dollars for a mixture that is predominantly cheap table salt and anti-caking agents like silicon dioxide.
You already own the individual components required to make these blends. A standard taco seasoning consists entirely of spices currently sitting in your pantry: chili powder, cumin, oregano, garlic powder, onion powder, and a dash of paprika. By measuring these out into a small mason jar and shaking them together, you replicate the exact flavor profile of the commercial packets without the excessive sodium or chemical preservatives.
Creating your own blends allows you to tailor the heat levels and flavor intensities to your family’s specific tastes. This practice frees you from the tyranny of the single-use flavor packet and drastically improves the quality of your weeknight dinners while keeping more cash in your wallet.
The Bottom Line: What This Means for Your Wallet
The financial impact of making these ten items at home extends far beyond saving a few dollars at the checkout register. When you systematically eliminate high-margin, heavily processed convenience foods from your shopping cart, you fundamentally restructure your entire grocery budget. Saving five dollars on oat milk, six dollars on cold brew, and seven dollars on artisanal bread might seem insignificant in isolation, but these weekly expenses compound rapidly.
By investing a few hours of your time each week into basic food preparation, you reclaim thousands of dollars annually that previously went toward corporate profit margins and packaging costs. You insulate your family against unpredictable inflation and volatile supermarket pricing. More importantly, you take direct ownership of the ingredients entering your home, proving that true financial frugality directly aligns with eating healthier, higher-quality food.
Frequently Asked Questions
Does making my own groceries really save enough money to justify the time?
Yes, the hourly return on investment is remarkably high for these specific items. Making cold brew or salad dressing takes less than five minutes of active kitchen time but saves you several dollars per batch. When you calculate the money saved against the actual minutes spent preparing the food, you often earn the equivalent of forty to fifty dollars an hour in tax-free savings.
What equipment do I need to start making these items?
You do not need to invest in commercial-grade kitchen gadgets to achieve excellent results. A standard food processor, a basic blender, a few glass mason jars, and a fine-mesh strainer will allow you to make almost everything on this list. Start with the tools you already own before purchasing any specialized equipment.
How long do homemade grocery items last without preservatives?
Homemade foods lack the chemical preservatives found in commercial products, meaning they have a shorter shelf life. Oat milk and cold brew generally stay fresh for five to seven days in the refrigerator. You can easily manage this by making smaller, weekly batches that perfectly match your family’s actual consumption rate.
Which grocery item provides the highest immediate cost savings?
Cold brew coffee and premium oat milk offer the largest percentage-based savings because you are replacing products heavily marked up for convenience. Shifting away from five-dollar cartons of oat milk to thirty-cent homemade batches provides an immediate, noticeable reduction in your weekly grocery receipt.
For consumer protection information, visit the Federal Trade Commission (FTC) and the Consumer Financial Protection Bureau (CFPB). For product safety and reviews, consult Consumer Reports.
Disclaimer: This article is for informational purposes only and does not constitute financial advice. The content reflects the author’s opinion and research at the time of writing. Always do your own research before making financial decisions.


Leave a Reply